Learn: How to Use Self Centering Drill Bit Successfully
It is by default that every beginner or expert can make mistakes during the work of any project, and it is not
bearable for anyone to compromise the accuracy or aesthetic appeal.
So, if you’re searching a method or tool which can help you to get accurate and centered holes in your DIY projects.
Then, you’re in the right place.
In this article, I will explain not only the importance of the tool, which is designed for drilling operations with unparalleled precision but also how to use self centering drill bit.
Whether you’re a seasoned or a DIY enthusiast, mastering the art of using self-centering drill bits can take your projects to a new level of precision.
Let’s get started.
Definition of Self Centering Drill Bit
It is a specialized tool with a built-in mechanism that maintains the alignment during the drilling process automatically. You do not need to adjust it manually to ensure the accurate and centered holes in various materials.
When and Why You Should Use the Self-Centering Drill Bit
Self-centering drill bits come into play precisely when accuracy is paramount. Here’s a closer look at situations where these specialized tools prove indispensable:
1- Woodworking Projects:
Whether you’re crafting furniture or engaged in intricate woodworking tasks, self-centering drill bits excel at delivering clean and perfectly centered holes in wood. It is particularly crucial when joining pieces or creating decorative elements.
2- Metalworking Applications:
With self-centering drill bits, you can confidently achieve the desired hole location without fear of errors or material damage and increase the efficiency and quality of the metalworking process.
3- Cabinet Installation:
When installing cabinets, hinges, handles, and shelves, It is also crucial to create a precise hole because a little deviation will lead to damage to the structure. Self-centering drill bits simplify the process to allow accurate hole alignment and minimize the likelihood of errors.
4- Enhanced Efficiency in Repetitive Tasks:
For tasks that involve drilling multiple holes with consistent spacing, self-centering drill bits shine. They streamline the process, eliminating the need for manual measurements and reducing the potential for errors that can arise in repetitive actions.
Anatomy of a Self Centering Drill Bit
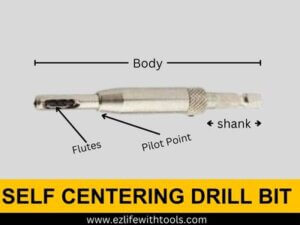
- Body: It is the main part of a self-centering drill bit made of high-speed steel or carbide. The whole strength and durability of the drill bit depends on it.
- Shank: It is also the basic part of a self-centering drill bit available in different sizes. Because this part is attached to the drill’s chuck to perform its work.
- Flutes: Spiral grooves along the body that help evacuate chips and debris during drilling.
- Pilot Point: The critical element, a retractable rod or spring-loaded guide, is responsible for automatic centering.
Consideration Factors for the Ideal Self Centering Drill Bit
Here are some essential tips for choosing the right tool for your specific needs:
1- Material Compatibility:
Always check the compatibility of the drill bit you have selected because every self-centering drill can make holes in specific materials such as wood, metal, or plastic.
2- Bit Size and Range:
Pay attention to the size and range of the self-centering drill bit. Choose a size that aligns with the diameter of the holes you need. Some bits are adjustable to provide versatility for various hole sizes.
3- Type of Self-Centering Mechanism:
Self-centering drill bits are designed with various mechanisms to achieve precision. Some of them have spring-loaded mechanisms, while others have sleeves to guide.
Understand the type of mechanism each bit employs and choose one that aligns with your comfort and the demands of your project.
4- Quality and Durability:
If you are tackling challenging tasks frequently, Invest in high-quality drill bits. Because if you use the best quality self-centering drill bit, it will ensure durability and longevity.
5- Depth Stops:
Use depth stops to control the depth of your drill holes. It will ensure uniformity to prevent accidental over-drilling.
Choosing the Right Self Centering drill bit
- Choose the Drill Bit According to the Material
- Selecting the Proper Size for the Desired Hole
- Consideration of Project Type and Specific Requirements
1- Choose the Drill Bit According to the Material
In the market, there are different types of self-centering drill bits available, and each type is suited to varying types of materials.
- Wood: For woodworking projects, choose self-centering bits designed for wood. They usually have sharp cutting edges that are suitable for clean cuts in various types of wood.
- Metal: This type of bit is specially designed for metalworking with coatings of titanium or cobalt. This unique treatment makes them durable and heat resistant.
- Plastics: In this situation, low cutting speed and sharp points self-centering drill bits are suitable. Because plastic is a soft material, it can be melted due to the high speed.
2- Selecting the Proper Size for the Desired Hole
Choosing the right size self-centering drill bit is critical to achieving the desired hole dimensions. Follow these instructions.
- Match the Bit Size to the Screw: If you’re drilling to fasten the screws, choose a bit according to the size of the screw size to ensure proper anchoring.
- Consider Depth Requirements: For projects with specific depth requirements, adjust the depth stop on the drill or use a depth collar to control drilling depth precisely.
3- Consideration of Project Type and Specific Requirements
The nature of your project and specific requirements should influence your choice of self-centering drill bit:
- General Drilling: For basic drilling tasks, a standard self-centering bit is often sufficient. These bits provide a reliable core for a variety of applications.
- Hinge Installation: If you are installing hinges, choose a hinge drill bit designed to create precise recesses for the hinge plates. These bits often have additional features for accurate hinge placement.
- Countersinking: When countersinking is required, choose a self-centering countersink bit to create recesses for screws while maintaining a flush finish.
- Plug Cutting: For wood plug-cutting projects, choose a self-centering plug cutter bit. These bits ensure accurate plug creation to hide the patch.
How to Use Self Centering Drill Bit Successfully Step-by-Step
Definitely, drilling is not a complicated process. But there is a massive difference between just drilling and accurate drilling. For precise drilling with a self-centering drill bit, follow these simple steps.
Step 1:
Before drilling, secure the workpiece with the help of clamps or vice bench because a stable workpiece minimizes the risk of misalignment during drilling.
Step 2:
Now, using a pencil or marker, locate and mark the place where you want to drill the holes. These marks will work as a guide for you during the drilling process. It is an essential point; if you mark it wrong, it will affect the whole accuracy.
Step 3:
Now, adjust the speed and torque of the drill according to the material you are working with. It will save your project’s aesthetic appeal and minimize the chances of damage.
Step 4:
Insert the self-centering drill bit into the drill chuck and make sure that it is securely tightened to prevent wobbling during operation.
Step 5:
Position the drill bit over the marked points on your workpiece. The self-centering mechanism should engage, automatically aligning the bit with precision.
Step 6:
When ready, start the drill and apply steady, even pressure. Allow the self-centering mechanism to guide the bit, preventing any deviation from your marked points.
Step 7:
Keep a close eye on the depth of your drilling by using depth stops or markings on the drill bit. Exercise control to ensure uniform hole depths.
Step 8:
After the completion of one hole, replace the drill from the spot, remove debris, and repeat the same process for each hole.
Advantages of Using Self Centering Drill Bit
Self-centering drill bits provide many advantages. Let’s consider the main advantages that distinguish these bits:
- Without the need for complex measurements or constant adjustments, you can create accurate holes for your project.
- It not only saves time but also reduces physical stress on the operator.
- The self-centering mechanism effectively reduces this risk, ensuring that the drill continues and produces clean, accurate holes.
- The automatic centering mechanism significantly reduces the possibility of human error during drilling.
Common Mistakes to Avoid
While using self-centering drill bits, be mindful of these common mistakes that can compromise the precision of your drilling.
- If you don’t secure your workpiece correctly, it can lead to movement during drilling, resulting in defective holes.
- Please don’t use it over the speed setting; it can cause overheating, reduced effectiveness, and potential damage to the drill bit.
- Forgetting to monitor the drilling depth can result in uneven holes, affecting the overall quality of your project.
- Don’t forget to clean the debris. Even a small amount of debris can cause the drill bit to have low performance.
Conclusion
The use of self-centering drill bits not only brings precision and efficiency to your drilling projects but also demands a commitment to safety and proper techniques.
By selecting the right bit for the project and following the step-by-step process, you can significantly enhance the drilling accuracy.
I hope you enjoyed the reading journey with me.
Thank you for your time.
Best wishes